This is part two of a two part series about Flutter. Please note that this part is intended as a developer guide, so if you’re looking for an explanation about why we love Flutter, check out Part One. Developers, carry on!
Getting started with Flutter
So you want to learn Flutter? Great! In this tutorial I’ll show you how to create an app for both iOS and Android that will call out to this server and check if the entered password has been publicly cracked. To get started, head over to Flutter’s great getting started instructions and get the platform installed. I highly suggest following the instructions on getting Android Studio installed and set up to run with the Flutter system while you are at it, because they have done a phenomenal job integrating with it. Get the editor you are going to use with it set up either way.
Once you have the framework set up we are going to start by creating our app project. I named mine password_checker. You will also want to start up your emulator/simulator, so that you have the app running while you are tweaking it. (Past this point I’ll be assuming you are using Android Studio in these instructions, but the code will be the same no matter what editor you are using.)
Anatomy of a Flutter project
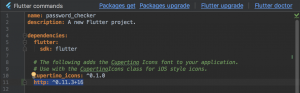
pubspec.yaml (file): This is basically the project file for Dart projects. In this we set our project name, description, dependencies and more. Be sure to read the comments in here to get a better picture of what is suggested/possible.
lib (folder): This is the home of all of our Dart code. You will want to build your app’s hierarchy here.
ios and android (folders): These are the platform-specific parts of the project. For the most part you won’t need to touch these.
test (folder): This is where your tests live.
Getting things going
lib/main.dart is the starter code for our app. If you created your project with Android Studio it will auto-open this file for you to get started immediately. Otherwise you’ll need to pick that file from the project hierarchy in the left panel. Now that we can see our code, let’s go ahead and start our emulator and give the starter code a run.


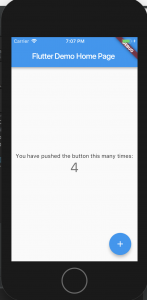
Once your emulator/simulator has started up you can click the green play button to start running the app on the device you selected/started. Click the “+” floating action button (FAB) a few times and watch the label update with the increment.
Looking at the code, you will notice lots of comments that will help you to understand a bit more of what is going on and how to tweak various things.
Now we can change something, save the file and watch it update in the emulator, so let’s start with the title we send into our MyHomePage instance. Change it from “Flutter Demo Home Page” to “Password Checker” and then switch to the emulator and you’ll see the text in the app bar has changed to “Password Checker”. That is the legendary hot-reload system for Flutter in action.
Now that we have a taste, let’s start doing some real work! I deleted all the comments in my source file to clean things up a bit. Then I found the _MyHomePageState class. The build method in this class is what is building the home page we are seeing rendered on the screen. The Minimum Viable Product (MVP) for this project is having a text field where the user can enter their password, a text label to show the user the count we get back from the backend, and a button to initiate the check. We are starting with two text labels and one button via the FAB, so we just need to change one of the labels to a field and add the business logic in order to have a MVP.
Getting text input
Flutter has great documentation so if we do a search for “textfield” on flutter.io we’ll get some good results. The very first entry (at time of publication) is what we are looking for: Retrieve the value of a text field – Flutter. This article walks us through adding a TextField along with its TextEditingController, which will handle a LOT of the behind the scenes work for us. Adding this to our project is pretty straight forward. Start by creating a final variable in the _MyHomePageState class called _password.
final _password = new TextEditingController();
Put this just above the existing _counter variable. Next we want to add a custom dispose method to the class, so we can have it clean up the controller when this widget (screen) is disposed of. Mine looks like this:
@override
void dispose() {
  _password.dispose();
  super.dispose();
}
As long as it’s in the class, it doesn’t matter where you put this. Now let’s take the first Text widget and convert it to a TextField. First change the widget type, delete the previous text, and then hit CTRL+Space to look at the attributes you can set for this widget. Pick controller: and then put _password as the value for it. So in the end, this:
new Text(
  'You have pushed the button this many times:',
),
becomes:
new TextField(
  controller: _password,
)
Getting ready for the logic
If you then save, you should see what was text is now a text field. You can even type in it and it will behave as expected. So now that we have all the widgets we need, let’s fill out the business logic starting with some renaming.
Find the method declaration for _incrementCounter and right click it. Select Refactor > Rename… Then change this to _checkPassword to make it line up with what it will be doing. Next, find down in the build method where the FloatingActionButton widget is created and change the tooltip to “Check Password” and the child (which is an Icon) to Icons.search (instead of Icons.add). The onPressed: should already be properly to our newly renamed method above. This will make our FAB look more like what you expect in an app that is searching something.
Start the logic
In our _checkPassword method we want to make a http get request. Lookup in the flutter.io site “http” and the first result tells us some methods to fetch data. We find that there is a package called http with a get method that returns a Future<Response>.
For those used to the future/promise pattern of concurrency, this will be old hat, but for the rest, let me explain. get is returning a Response wrapped in a Future. The Future is kind of like a placeholder that the get method returns with the promise of filling it with an actual Response object at some point in the future. To get the Response object out of it we can add the await keyword before the get call. This will “wait” or “yield” at this point until the get method returns our Response, and then the await tells the Future to unwrap the Response object and we are left with just the Response from the server. In order for a function to let you use await, and thus yield properly when it hits that point in the code, it must be marked as async. Making this asynchronous (async) is important because it makes sure that our logic doesn’t block, stop, or slow down our graphic rendering or interaction with the user.
To use this package we must first add it as a dependency in our pubspec.yaml file. Below the:
cupertino_icons: ^x.x.x
You can add something like the following based on the version of the package you want to use:
http: ^0.11.3+16
Save, and Android Studio will prompt you to choose some options you may be interested in since you have updated your pubspec.yaml file. We will want to hit the option Packages get.
Getting back to our code, we first need to add two new imports at the top of our file:
import 'package:http/http.dart' as http;
import 'dart:async';
Now that we have our libraries imported we can start using them! We will start by using Refactor > Rename… again this time on the _counter variable to change it to _count. Next we’ll change the type of it from int to String and the default value from 0 to “”(or “?” if you rather). Now we can move to our _checkPassword function and make it async, add our get request making use of the _password controller’s text, and set the _count by changing it to look like this:
void _checkPassword() async {
  final response = await http.get('https://api.pwnedpasswords.com/pwnedpassword/'+_password.text);
  setState(() {
    _count = response.body;
  });
}
Notice that the _count must be set in the call back sent into the setState function to trigger a re-build of the widget on screen.
And we’re done! MVP finished. SHIP IT!

But seriously, with 9 new lines of code and some tweaking we have our MVP that will build and run just fine on both Android and iOS! This is the beauty of Flutter. As you get more used to it and its patterns, you’ll be amazed at how quickly you can get your MVP up and then start polishing even faster with the hot-reload cycle.
Extra credit
Visual learner? Check out the Password Checker App how-to video on YouTube here.
Suggested features to add to the app:
- Add a bit of polish by looking here and adding the hint text so that when the app loads up, the user knows what to put in the text box.
- Add history that is stored locally in the shared_preferences so it persists between runs of the app.
- Add a share button (I would suggest a FlatButton) so that the user can brag about how their password has only been seen 7,000 times in the wild.
- Add a spinner when talking to the server so the user knows something is happening. (You can also disable the FAB during the load to stop users from rapid firing requests)
Or make your own and tell us about it!
Want to see the finished product? Here’s the code with extras.